

In today’s digital landscape, websites serve as the primary gateway for businesses and individuals to connect with their audience. Unfortunately, cyber threats loom large, and even the most vigilant website owners may find themselves victims of hacking attempts. As a leading web solutions provider, Kiwi Web Solutions understands the importance of safeguarding your online presence and offers comprehensive guidance on recovering a hacked WordPress website. In this detailed guide, we will walk you through the essential steps to take when faced with a compromised website, ensuring that your WordPress site is restored to its full glory with improved security measures.
Identifying the Hack:

A. Recognize the Signs of a Hacked Website:
Detecting a hacked website in its early stages is crucial for minimizing the potential damage and swiftly initiating the recovery process. Being vigilant and aware of the signs of a hacked website allows you to take prompt action. Here are some common indicators to watch for:
- Sudden Traffic Drop: If you notice a sudden and significant decrease in your website’s traffic, it could be a sign that search engines or security systems have flagged your site as compromised. Hackers may have injected malicious code or content that affects your search engine rankings or leads to blacklisting.
- Unexpected Redirects: If your website visitors are being redirected to unrelated or suspicious websites without their consent, it’s likely that your site has been hacked. Unauthorized redirects can lead to phishing sites or sites that distribute malware, harming your visitors’ experience and your website’s reputation.
- Altered Content: Hacked websites often display unauthorized or spammy content on their pages. If you come across unfamiliar content or advertisements that you did not create, your website might have been compromised.
- Increased Server Load: A sudden surge in server resource usage or unusual server load can indicate that your website is being abused by hackers. They may be using your server to host malicious files or carry out attacks on other websites.
- Email Issues: If your website sends out spam emails to your users or others, it could be a sign of a hack. Hackers may exploit your server to send out phishing emails or mass spam, impacting your domain reputation.
B. Perform a Security Audit to Pinpoint the Entry Point and Extent of the Hack:
Once you have noticed the signs of a potential hack, it’s crucial to conduct a comprehensive security audit to gain a deeper understanding of the attack. A security audit will help you identify the entry point used by hackers and assess the extent of the damage. Follow these steps to perform a security audit:
- Utilize Security Plugins: To conduct an in-depth security audit, leverage reputable security plugins such as Sucuri, Wordfence, or MalCare. These plugins are equipped with scanning capabilities that can search for malware, vulnerabilities, and other suspicious activities.
- Scan Website Files: Initiate a thorough scan of your WordPress website files, including themes, plugins, and the core WordPress installation. The security plugin will look for any modified, added, or suspicious files that might indicate a breach.
- Examine the WordPress Database: A crucial part of the security audit is inspecting the WordPress database for any unauthorized changes or injected code. Hackers often use the database to store their malicious scripts or gain unauthorized access.
- Check User Accounts: Review the user accounts on your website and look for any suspicious or unfamiliar accounts. Hackers might create new administrator accounts to retain control of your website even after initial access is blocked.
- Review Server Logs: Access your server logs to identify any unusual or unauthorized activities. The logs can provide valuable insights into potential points of entry, patterns of attacks, and IP addresses involved.
- Verify File Integrity: Compare the checksums or hashes of critical files against their known secure versions. Changes in file integrity could indicate tampering by hackers.
- Assess Website Functionality: Check for any abnormal behavior or functionality issues on your website. For example, broken links, altered layouts, or malfunctioning forms could be a result of a hack.
- Analyze Traffic Patterns: Monitor your website’s traffic patterns to identify any unusual spikes or patterns that might be associated with the attack.
Backup Your Website:
A. Create a Full Backup of Your Website Files and Database before Making Any Changes:
Creating a comprehensive backup of your WordPress website is a critical precautionary step before embarking on any recovery or security-enhancing measures. A full backup ensures that you have a complete snapshot of your website, including all files and the database, which can be invaluable in the event of data loss or further complications during the recovery process. Follow these steps to create a reliable backup:
- Use a Reliable Backup Plugin: Choose a reputable backup plugin that suits your needs and is compatible with your WordPress setup. Popular backup plugins like UpdraftPlus, BackupBuddy, and Duplicator offer easy-to-use interfaces and customizable backup options.
- Configure Backup Settings: Access the backup plugin’s settings and select the files and database tables you want to include in the backup. Typically, a full backup includes your WordPress core files, themes, plugins, media files, and the entire database.
- Schedule Automated Backups: Set up a regular backup schedule to ensure that your website is backed up automatically at specified intervals. Daily or weekly backups are recommended, depending on how frequently you update your website’s content.
- Perform a Manual Backup: Before making any significant changes to your website, perform a manual backup to ensure that you have the latest data saved in case anything goes wrong during the recovery process.
B. Store the Backup Securely in an External Location:
Merely creating a backup is not enough; it is equally crucial to store it securely in an external location away from your primary hosting environment. Safeguarding your backup ensures that you have a fail-safe option to restore your website in the event of a catastrophic breach or accidental data loss. Follow these best practices for securing your backup:
- Use Secure Cloud Storage: Utilize reputable cloud storage services like Google Drive, Dropbox, Amazon S3, or a private cloud solution to store your backups securely. These services offer encryption and redundancy, minimizing the risk of data loss.
- Offline Backup Storage: Consider saving an offline copy of your backup on an external hard drive or a physical storage device. Offline backups provide an added layer of protection against cyberattacks, as they are not directly accessible from the internet.
- Encrypt Sensitive Data: If your backup contains sensitive information, ensure that it is encrypted to protect it from unauthorized access.
- Restrict Access to Backups: Limit access to the backup files to trusted personnel only. Implement proper authentication and authorization controls to prevent unauthorized individuals from accessing critical data.
- Test Backup Restoration: Periodically test the restoration process from your backup to confirm that it is viable and complete. This practice ensures that you can rely on your backup in times of need.
Take Your Website Offline:
A. Temporarily Take Your Website Offline to Prevent Further Damage:
When dealing with a hacked WordPress website, time is of the essence. To prevent any further harm and protect your visitors from potential security risks, it’s essential to take your website offline temporarily. By doing so, you minimize the exposure of your site to potential attackers and give yourself the necessary space to implement recovery measures.
- Access Hosting Control Panel: Log in to your hosting account and access the control panel provided by your hosting provider.
- Disable Website Access: Locate the option to take your website offline or put it into maintenance mode. This feature is commonly available in most hosting control panels.
- Enable Maintenance Mode Plugin: Alternatively, you can use a maintenance mode plugin installed on your WordPress site. These plugins allow you to display a custom maintenance message while the site is under temporary maintenance.
B. Display a Maintenance Message to Inform Users about the Situation:
Once you have taken your website offline, it’s vital to inform your visitors about the ongoing maintenance and security procedures. A clear and concise maintenance message provides transparency and reassures your users that you are aware of the situation and actively addressing it.
- Craft a Maintenance Message: Create a simple and informative message that explains the temporary unavailability of your website. Include a brief explanation of the security incident and assure users that you are working to resolve the issue.
- Use a Maintenance Mode Plugin: If you have opted for a maintenance mode plugin, customize the message using the plugin’s settings. Some plugins allow you to add branding elements, contact information, and an estimated time for when the site will be back online.
- Design a User-Friendly Page: Keep the maintenance page clean and user-friendly. Avoid technical jargon and provide a user-friendly message that anyone can understand.
- Include Contact Information: Add relevant contact information or support channels where users can reach out for further inquiries or assistance.
Change All Passwords:
A. Change the Passwords for Your WordPress Admin, FTP, Database, and Hosting Accounts:
In the aftermath of a hack, it’s imperative to assume that all your login credentials may have been compromised. Changing passwords across various accounts adds an extra layer of security and ensures that unauthorized individuals can’t regain access.
- Change WordPress Admin Password: Access your WordPress dashboard and navigate to the User section. Update the password for your main admin account.
- Change FTP Password: Access your hosting account and update the FTP (File Transfer Protocol) password. This password is used to access your website’s files on the server.
- Change Database Password: Update the password for your website’s database, ensuring that it’s strong and unique.
- Change Hosting Account Password: Log in to your hosting account and change the password associated with your hosting account.
B. Ensure Strong and Unique Passwords for Each Account:
Creating strong and unique passwords is essential to protect your website from brute-force attacks and unauthorized access. Weak or reused passwords are a common entry point for hackers.
- Utilize Password Managers: Consider using password managers like LastPass or Dashlane to generate and store strong, unique passwords for each account.
- Password Complexity: Ensure that your passwords are at least 12 characters long and include a mix of uppercase and lowercase letters, numbers, and special characters.
- Avoid Common Passwords: Avoid using easily guessable passwords such as “password123” or common phrases. Opt for random combinations that are difficult for hackers to predict.
- Enable Two-Factor Authentication (2FA): Implement 2FA for an extra layer of security. This requires users to provide a second verification method, such as a one-time code sent to their mobile device, in addition to their password.
Update WordPress Core, Themes, and Plugins:
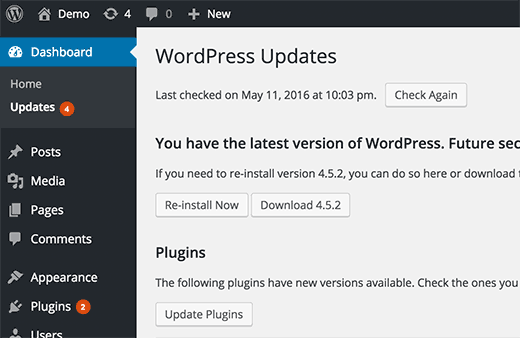
A. Update WordPress to the Latest Stable Version:
Keeping your WordPress core up to date is crucial for security and performance improvements. Developers regularly release updates to address vulnerabilities and bugs, ensuring a more secure and stable platform.
- Check for Available Updates: Access your WordPress dashboard and navigate to the Updates section. Check for any available core updates.
- Backup Before Updating: Before proceeding with any updates, create a backup of your website to have a restore point in case of any compatibility issues.
- Update WordPress Core: Click on the “Update Now” button to update your WordPress core to the latest stable version.
B. Update All Themes and Plugins to Their Latest Versions:
Outdated themes and plugins are common entry points for hackers to exploit vulnerabilities. By keeping them up to date, you ensure that your website benefits from the latest features and security patches.
- Check for Available Updates: In the same Updates section of your WordPress dashboard, check for available theme and plugin updates.
- Update Themes and Plugins: Click on the “Update Now” button next to each theme and plugin to apply the latest updates.
C. Remove Any Unused or Outdated Themes/Plugins:
Unused or outdated themes and plugins can be a security risk, as they may contain vulnerabilities that hackers can exploit. Removing them reduces the potential attack surface of your website.
- Navigate to Themes and Plugins: Access the Themes and Plugins sections of your WordPress dashboard.
- Deactivate and Delete Unused Themes/Plugins: Deactivate any themes or plugins that are not in use. Then, delete them from your website entirely.
Scan for Malware and Remove It:
A. Use Reputable Security Plugins to Scan Your Website for Malware and Malicious Code:
Security plugins play a pivotal role in identifying malware and malicious code that may have infiltrated your WordPress website. Utilizing trusted and up-to-date security plugins enhances your ability to detect and combat potential threats effectively.
- Choose a Reliable Security Plugin: Research and select a reputable security plugin such as Sucuri, Wordfence, or MalCare, known for their malware scanning and removal capabilities.
- Initiate a Full Website Scan: Activate the security plugin and perform a full scan of your website files, themes, plugins, and database. The plugin will meticulously analyze every nook and cranny of your website, seeking out any suspicious code or files.
B. Identify and Remove Any Infected Files or Code Snippets:
Once the security scan is complete, the plugin will provide a detailed report highlighting the malware and infected files found on your website. It’s imperative to take immediate action to remove these threats to safeguard your website’s integrity.
- Quarantine Infected Files: Some security plugins offer the option to quarantine infected files, isolating them from the rest of the website until you can safely remove or clean them.
- Replace Compromised Files: In cases where infected files are identified, manually replace them with clean versions from your backup or the original source. Alternatively, you can utilize a malware removal service offered by the security plugin.
C. Ensure All Website Files are Clean and Free from Threats:
After removing the detected malware, perform another scan to verify that your website is now clean and free from any remaining threats.
- Confirm a Clean Scan: Rerun the security scan to ensure that all malware has been successfully removed and that your website is now secure.
- Monitor Regularly: Regularly monitor your website for any signs of suspicious activity, and perform periodic security scans to stay ahead of potential threats.
Check User Permissions and Roles:
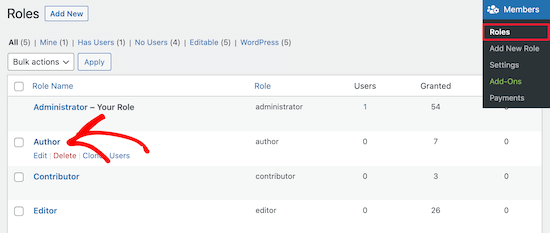
A. Review the User Accounts on Your Website and Remove Suspicious or Unauthorized Users:
Regularly reviewing the user accounts on your WordPress website is crucial for maintaining a secure online environment. Ensuring that only trusted individuals have access helps prevent unauthorized activities and potential security breaches.
- Access User Management: Navigate to the User section on your WordPress dashboard and review the list of registered users.
- Delete Suspicious Accounts: Identify any accounts that appear suspicious or unfamiliar, and promptly remove them from your website.
B. Update User Roles and Permissions as Needed to Restrict Access:
Updating user roles and permissions provides an additional layer of security by controlling the level of access granted to different user accounts. Restricting access to only what is necessary minimizes the risk of unauthorized changes or malicious actions.
- Assign Appropriate User Roles: Review the roles assigned to each user and ensure they align with their responsibilities and privileges. Administrators should be limited to trusted individuals who require full control of the website.
- Implement Least Privilege Principle: Follow the principle of least privilege, granting users the minimum level of access necessary to perform their tasks effectively.
Inspect .htaccess and wp-config.php Files:
A. Verify the Integrity of the .htaccess and wp-config.php Files:
The .htaccess and wp-config.php files are critical components of your WordPress website’s configuration. Verifying their integrity is essential to ensure that no unauthorized changes have been made to these vital files.
- Access Server Files: Use an FTP client or access your hosting control panel to navigate to the root directory of your website.
- Check .htaccess and wp-config.php: Examine the .htaccess and wp-config.php files to ensure that they haven’t been tampered with or modified without your knowledge.
B. Remove Any Suspicious Code Injected into These Files:
Hackers may inject malicious code into the .htaccess and wp-config.php files to gain control or disrupt your website’s functionality. If you find any suspicious code, it’s crucial to remove it immediately.
- Backup Before Modification: Before making any changes, create a backup of the original .htaccess and wp-config.php files to have a restore point.
- Manually Remove Suspicious Code: Using a text editor, open the .htaccess and wp-config.php files, and carefully remove any suspicious code or lines that you didn’t add.
Scan the Database:
A. Scan Your WordPress Database for Suspicious Content and Links:
The WordPress database contains crucial information about your website, and hackers may use it to store malicious content or links. Scanning the database helps identify any unauthorized entries that need to be addressed.
- Use Database Security Plugins: Employ reliable security plugins that offer database scanning capabilities. These plugins will thoroughly examine your database for suspicious content, links, or unauthorized entries.
- Identify Malicious Content: The security plugin will provide a detailed report of any suspicious content or links found in your database. Take note of these findings to take appropriate action.
B. Remove or Modify Any Unauthorized Database Entries:
Upon identifying suspicious content or links in the database, it’s essential to remove or modify them to eliminate potential threats to your website.
- Backup the Database: Before making any changes, create a backup of your database to ensure you have a restore point in case of any issues.
- Manually Remove or Modify Entries: Depending on the security plugin’s recommendations, you may need to manually remove or modify the unauthorized entries from the database. Exercise caution while doing so to avoid accidental data loss.
Secure Vulnerabilities:
A. Analyze the Security Vulnerabilities That Led to the Hack:
Understanding the vulnerabilities that allowed the hack is crucial to prevent future attacks. Analyze the attack vector used by hackers to identify weak points in your website’s security.
- Conduct a Security Audit: Review your website’s code, plugins, themes, and configurations to pinpoint vulnerabilities. Assess areas like outdated software, insecure login systems, or unvalidated user inputs.
- Seek Professional Help: If you are unsure about analyzing the vulnerabilities, consider consulting with security experts who can conduct a thorough assessment of your website.
B. Patch or Fix These Vulnerabilities to Prevent Future Attacks:
Once you have identified the vulnerabilities, take immediate steps to patch or fix them. This proactive approach helps secure your website against similar attacks in the future.
- Update Software and Plugins: Keep your WordPress core, themes, and plugins up to date. Developers frequently release security patches to address vulnerabilities.
- Implement Security Best Practices: Follow industry best practices for website security, such as using secure coding practices, validating user inputs, and restricting access to critical files.
Install Security Plugins:
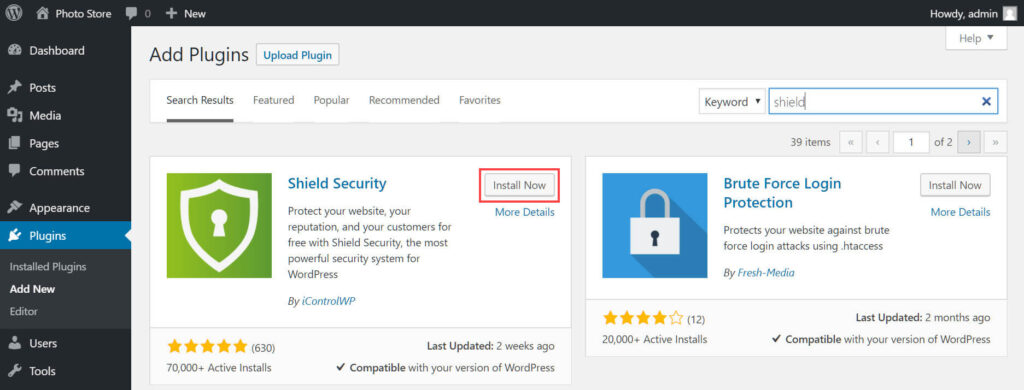
A. Install Reputable Security Plugins to Enhance Website Protection:
Security plugins provide a robust layer of defense against various cyber threats. Install reputable security plugins tailored to WordPress to strengthen your website’s protection.
- Research and Choose Trusted Plugins: Explore the WordPress plugin repository or reputable sources to find security plugins with positive reviews and a track record of effectiveness.
- Install and Activate the Plugins: Once you have selected suitable security plugins, install and activate them on your website.
B. Set Up Features Like Firewall, Login Attempts Monitoring, and Malware Scanning:
After installing the security plugins, configure them to optimize website protection.
- Enable Web Application Firewall (WAF): A WAF filters and blocks malicious traffic before it reaches your website server, preventing many common types of attacks.
- Monitor Login Attempts: Set up the security plugin to monitor and limit the number of login attempts to protect against brute-force attacks.
- Schedule Regular Malware Scanning: Configure the security plugin to perform regular malware scans to detect and remove any potential threats.
Monitor Website Activity:
A. Keep Track of Website Activity and Server Logs for Any Unusual Behavior:
Monitoring your website’s activity and reviewing server logs allows you to detect anomalies or suspicious patterns that may indicate a security breach.
- Access Server Logs: Access your hosting control panel to review server logs. Pay attention to unusual IP addresses, frequent login failures, or any irregular activities.
- Analyze Website Traffic: Use tools like Google Analytics to monitor website traffic. Sudden spikes or unusual patterns may indicate malicious bot activity or other security issues.
B. Enable Email Notifications for Critical Events:
Setting up email notifications for critical events ensures that you are promptly alerted about potential security threats or suspicious activities.
- Configure Email Alerts: Customize your security plugin settings to send you email notifications for specific events, such as login attempts, file changes, or website downtime.

Request Malware Review (if applicable):
A. If Your Website Was Blacklisted by Search Engines, Request a Malware Review:
In the event that your website was blacklisted by search engines due to a security breach, requesting a malware review is essential to clear your website’s reputation.
- Access Webmaster Tools: Log in to your Google Search Console (formerly Webmaster Tools) account.
- Request a Review: Navigate to the Security & Manual Actions section and request a review of your website after you have cleaned it of malware and taken necessary security measures.
B. Follow the Guidelines Provided by Search Engine Webmaster Tools:
Follow the guidelines and instructions provided by the search engine’s webmaster tools for the malware review process. Complying with these guidelines expedites the review and potential removal of the blacklist warning.


